Firebase: authenticating using e-mail link
In the previous post we explored how to secure an API using the framework Express. Something that was missing from that post is how to authenticate with the UI. As an addendum to that, we’ll see in this post how to authenticate using Firebase’s auth module.
Before we proceed, this series of posts is the content generated from the project Maratel, which is a small multi-tenant application to manage small hotels. The work put towards it is minimal and the posts are written as I progress. The project is separated into two repositories:
Now, the first authentication method supported will be the email link. When signing in, the user will provide its e-mail address and a link will be sent to his inbox, which will enable him to sign-in. This method doesn’t require a password. Here are some of the benefits of using it:
- Simpler sign-in and sign-up flows
- Authentication and e-mail address verification at the same time
- Password reuse reduced for multiple accounts
The first step before we start using this method is to enable it within Firebase’s console. More about it can be found here.
Before we move to the next section, let’s take a moment to look at the steps needed to make this flow works:
- The user has access to a sign-in page where it’ll inform its e-mail address.
- The user provides a valid e-mail address and get a link in his inbox.
- The user clicks on the link and get redirected to our application.
- The application asserts what its getting back through Firebase’s auth API.
- The application grants access to the user.
The initialization
Since Vue.js is powering the web part of this project, the snippets are meant to work with it. Now, let’s start adding Firebase to our project:
yarn add firebase
Once added, now it’s time to initialize the Firebase app by providing our app’s project configuration. This is what it looks like:
const firebaseConfig = {
  apiKey: "api-key",
  authDomain: "project-id.firebaseapp.com",
  databaseURL: "https://project-id.firebaseio.com",
  projectId: "project-id",
  storageBucket: "project-id.appspot.com",
  messagingSenderId: "sender-id",
  appId: "app-id",
  measurementId: "G-measurement-id",
};
This is all we need to initialize our application. From the main file, let’s initialize it:
import * as firebase from 'firebase/app';

// This is the only module we're interested for now
import 'firebase/auth';

firebase.initializeApp({
  apiKey: process.env.VUE_APP_FIREBASE_API_KEY,
  authDomain: process.env.VUE_APP_FIREBASE_AUTH_DOMAIN,
  databaseURL: process.env.VUE_APP_FIREBASE_DATABASE_URL,
  projectId: process.env.VUE_APP_FIREBASE_PROJECT_ID,
  storageBucket: process.env.VUE_APP_FIREBASE_STORAGE_BUCKET,
  messagingSenderId: process.env.VUE_APP_FIREBASE_MESSAGING_SENDER_ID,
  appId: process.env.VUE_APP_FIREBASE_APP_ID,
  measurementId: process.env.VUE_APP_FIREBASE_MEASUREMENT_ID
});
In the snippet above, we’re leveraging the .env integration that Vue.js provides, which is also aligned to the config rule of the 12 factors app. An example of a .env file for this project can be found here.
Now we have Firebase configured, it provides access to the auth API that we need. An important one allows us to know when the user authentication state changed. It’s represented like this:
firebase.auth().onAuthStateChanged(() => {});
This piece of code should go into our main file and the callback passed will be called once at the startup and when the state changes, for example, when the user signs in. An important note to take here: we need to mount our Vue.js app only when this method gets called. Without Firebase initialized, it’s not possible to allow or deny access as we’ll see below.
Here is how we initialize our Vue.js app using this method:
let mounted;

firebase.auth().onAuthStateChanged(() => {
  if (mounted) {
    return;
  }

  new Vue({
    router,
    vuetify,
    mounted: () => (mounted = true),
    render: h => h(App)
  }).$mount('#app');
});
Verifying whether the app is mounted or not is necessary to avoid multiple instances. The onAuthStateChanged method might get called more than once. Regarding the initialization, this is all we need.
The router
Vue.js Router is the official router for Vue.js. It deeply integrates with Vue.js core to make building Single Page Applications with Vue.js a breeze.
This is exactly what we need. More information about Vue.js router can be found here. We won’t get into the guts of it.
For this application, we’ll consider that all routes are secured and exclude what we want not to be. The non-secured ones for this flow are the sign-in page and the continue page. More on this later.
Let’s see the skeleton of the router:
const router = new VueRouter({
  mode: 'history',
  routes: [
    {
      path: '/',
      name: 'Home',
      component: () => import('../views/Home.vue')
    },
    {
      path: '/continue',
      name: 'Continue',
      meta: {
        anonymous: true
      },
      component: () => import('../views/Continue.vue')
    },
    {
      path: '/login',
      name: 'Login',
      meta: {
        anonymous: true
      },
      component: () => import('../views/Login.vue')
    }
  ]
});
As defined before, all routes will be secured, except the ones we mark as anonymous. We are able to inform which one isn’t secured by providing the meta property with anonymous: true inside.
With the routes defined, it’s now time to limit access for each route. Vue.js router provides a method called beforeEach that can be used to allow or deny access to the referred route. Here’s how we do it:
router.beforeEach((to, from, next) => {
  if (to.matched.some(record => record.meta.anonymous)) {
    next();
  } else if (firebase.auth().currentUser) {
    next();
  } else {
    next('/login');
  }
});
What is happening here is that we check first if the route is anonymous, allowing to continue in positive cases. Second, we check if the user is logged in by checking the Firebase is providing the authenticated user. We’re not checking for roles or anything right now. Lastly, we send everything else to the login page that can be accessed without any credentials.
With this piece of code, we have our routes protected. The parts missing now are the views. Let’s take a look at it in the next section.
The views
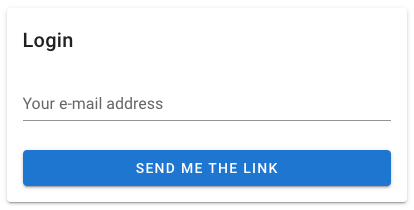
As described in the previous section, the flow requires two views, in this application represented by the login view and continue view. The login view will ask the user for a valid e-mail address and looks like this:
The same way the router has a beforeEach method, each view has also the ability to subscribe to router events, in this case, beforeRouteEnter. This method will be called before the route is even created and allow us to deny access or redirect to a different route. In this case, the user will be able to access only if it not logged in:
beforeRouteEnter: (to, from, next) => {
  if (firebase.auth().currentUser) {
    next('/');
  } else {
    next();
  }
}
When the user is logged in already, it gets redirected to home. Next, let’s take a look in the code when the button “send me the link” is clicked:
firebase
  .auth()
  .sendSignInLinkToEmail(this.email, {
    url: 'http://localhost:8080/continue',
    handleCodeInApp: true
  })
  .then(() => {
    localStorage.setItem('emailForSignIn', this.email);
  });
With the informed e-mail, we can call Firebase’s sendSignInLinkToEmail method. It’s necessary to inform two values here:
- url: will be used by Firebase to redirect the user once it clicks the link.
- handleCodeInApp: tells Firebase that the operation will be completed within our application.
When Firebase can successfully send the link, the e-mail address informed is being stored in our local store. This will be used by the continue view, that looks like this:
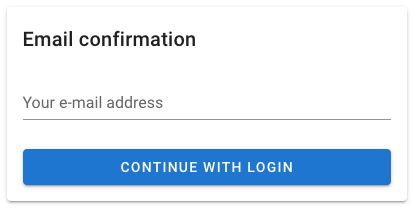
The continue view is shown only when the user asks for the link in one device or browser and tries to login in a different device or browser. This is very important to avoid session injection. Continue view will also leverage the beforeRouteEnter method to assess the information sent back by firebase. Here’s the code:
beforeRouteEnter: (to, from, next) => {
  if (firebase.auth().isSignInWithEmailLink(window.location.href)) {
    const email = localStorage.getItem('emailForSignIn');

    if (email) {
      firebase
        .auth()
        .signInWithEmailLink(email, window.location.href)
        .then(() => next('/'));
    } else {
      next();
    }
  } else {
    next('/');
  }
}
When Firebase calls back this route, it checks if the sign-in URL is valid through isSignInWithEmailLink. When it’s valid, we’ll try and verify if the e-mail we stored earlier is present, which will be used to sign in the user directly. The view won’t be shown unless the e-mail is missing.
That’s it! Once the user hits the button continue with login, the application shall grant access to it. Improvements such as role checking can be implemented easily.
As always, the source code can be seen on GitHub.
Thank you for reading!